|
The monopod has one leg instead of the standard three legs on the tripod. OTG Digital Photography is not possible without the monopod with a flexible ball head that allows the desired camera orientation needed to produce all types of photographs. The monopod is not considered a replacement for the tripod as the tripod will always be steadier for taking photographs. But the monopod is easier to carry, easier to move around, lighter than the tripod, less confining and quicker during OTG Digital Photography. In fact, the monopod will open new photo opportunities for you that did not exist if the camera was handheld or attached to a tripod. But for REAL low light exposures, the tripod is the only option. As better skills are acquired with the monopod, some low light situations can be photographed (but still not REAL low light situations).
So, what are the options for using the monopod? The first option of standing the monopod perpendicular to the ground is NOT an option. There is no pressure to the left, to the right, to the front, downward or to the back to keep the monopod from moving. Try it and see for yourself with your monopod. If you don't have a monopod, use a wooden dowel or a broomstick. All the following options are described based on a person looking trough the camera with the right eye and using your right hand on the shutter release.
Option 1:
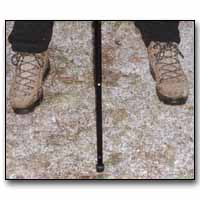 Figure 1 displays the left foot and the right foot in black color. The red circle indicates the position of the bottom of the monopod leg. The standard setup for the monopod is in the three legged position. The three legs consist of your left leg, your right leg plus the single leg of the monopod. This position copies the form of the standard tripod. But it is the weakest position of all the monopod options. The left and the right foot may either be parallel to each other or both feet may be slightly opened to a 10 degree angle. Practice this position without the monopod to decide on the exact position of the right and the left foot. Depending on the length of the tripod, it placed approximately 2 feet in front of your two feet. The monopod is at approximately a 20 degree angle. By using the ball head, the camera can be positioned vertically as well as horizontally. Bring the camera as close to your chest as possible and tuck your two elbows as close to the side of your body as possible, too. With your left hand, hold the top of the monopod and the bottom of the camera and exert gentle pressure down the length of the monopod to the ground. This will stabilize the monopod so that the leg does slip on the ground as well as moving
forward. Another option is to use the right hand on top of the monopod instead of the left hand thus
freeing the left hand if the left hand is needed for another purpose. The two elbows tucked into your body stop the monopod from moving right or left. The pressure of left hand stops the monopod from moving front to back. Practice using the monopod with option 1 until you feel extremely natural and comfortable.
Figure 1 displays the left foot and the right foot in black color. The red circle indicates the position of the bottom of the monopod leg. The standard setup for the monopod is in the three legged position. The three legs consist of your left leg, your right leg plus the single leg of the monopod. This position copies the form of the standard tripod. But it is the weakest position of all the monopod options. The left and the right foot may either be parallel to each other or both feet may be slightly opened to a 10 degree angle. Practice this position without the monopod to decide on the exact position of the right and the left foot. Depending on the length of the tripod, it placed approximately 2 feet in front of your two feet. The monopod is at approximately a 20 degree angle. By using the ball head, the camera can be positioned vertically as well as horizontally. Bring the camera as close to your chest as possible and tuck your two elbows as close to the side of your body as possible, too. With your left hand, hold the top of the monopod and the bottom of the camera and exert gentle pressure down the length of the monopod to the ground. This will stabilize the monopod so that the leg does slip on the ground as well as moving
forward. Another option is to use the right hand on top of the monopod instead of the left hand thus
freeing the left hand if the left hand is needed for another purpose. The two elbows tucked into your body stop the monopod from moving right or left. The pressure of left hand stops the monopod from moving front to back. Practice using the monopod with option 1 until you feel extremely natural and comfortable.
Option 2:

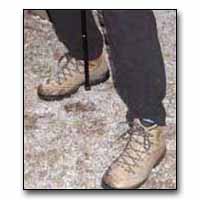 Figure 2 displays the left foot forward and the right foot back in black color. The red circle indicates the position of the bottom of the monopod leg. Option 2 is based on a right handed person. Reverse the position by having the left foot in front if needed. Option 2 is a very stable position with the left foot forward and the right foot in back. The left foot is not faced perfectly forward as the foot is approximately 10 degrees off of facing forward. The right foot is almost parallel to the left foot. It does not matter if the left foot faces forward and the right foot is at 90 degrees to the right foot. The important element is that your body is perfectly stable and does not lean from side to side of from front to back. The left leg is slightly bent. Practice this position without the monopod to decide on the exact position of the right and the left foot. Think of this position as a stable karate position similar the horse position. In karate, no matter which direction the force approaches, you will remain completely stable. Set the monopod next the instep of the right foot. This will stop the monopod from moving to the right or to the rear. Bend your left leg slightly and place the monopod next to the upper thigh of the left leg. The monopod now be at a 20 degree angle to the body and slightly tilting forward. With your left hand, hold the top of the monopod and the bottom of the camera and exert gentle pressure down the length of the monopod to the ground as well as slightly to the left. The pressure of the monopod to the left thigh will keep the monopod from moving to the left. This also will stabilize the monopod so that the leg does slip on the ground as well as moving forward. The monopod is now in a very stable position to pan from side to side and up or down. Vertical and horizontal photographs are possible. Another option is to use the right hand on top of the monopod instead of the left hand thus freeing the left hand if the left hand is needed for another purpose. Practice using the monopod with option 2 until you feel extremely natural and comfortable.
Option 3:

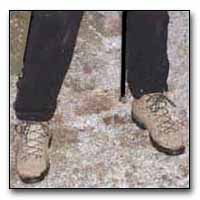 Figure 3 displays the left foot and the right foot in black color. The red circle indicates the position of the bottom of the monopod leg. Option 2 is based on a right handed person. Reverse the position by having the left foot in front if needed. The left and the right foot may either be parallel to each other or both feet may be slightly opened to a 10 degree angle. Practice this position without the monopod to decide on the exact position of the right and the left foot. Think of this position as a stable karate position similar the horse position. In karate, no matter which direction the force approaches, you will remain completely stable. Set the monopod through your legs and approximately 3-5 inches in back of your left foot. Your height and the flexibility of the monopod will determine the exact placement of the monopod. Bend your left leg slightly and place the monopod next to the upper thigh of the left leg while wrapping the monopod around the inside of the left leg. The monopod will approximately be a 20 degree angle to the body and slightly tilting forward. With your left hand, hold the top of the monopod and the bottom of the camera and exert gentle pressure down the length of the monopod to the ground as well as slightly to the left. This will bend the monopod ever so slightly. If the monopod does not easily bend, place the bottom of the monopod closer to the left foot. The pressure of the monopod to the left thigh will keep the monopod from moving to the left. This also will stabilize the monopod so that the leg does slip on the ground as well as moving forward. The monopod is now in a very stable position to pan from side to side and up or down. Vertical and horizontal photographs are possible. Another option is to use the right hand on top of the monopod instead of the left hand thus freeing the left hand if the left hand is needed for another purpose. Practice using the monopod with option 3 until you feel extremely natural and comfortable.
Option 4:
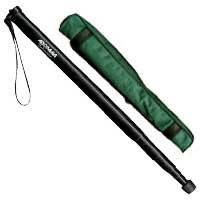
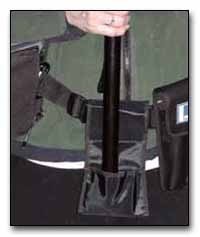 Option 4 consists of the monopod stabilizer pouch. The monopod pouch is worn on the OTG belt (see also the Camera & Belt Section). When you are on-the-go, the monopod is closed to the shortest length (about 10-14 inches). The monopod and camera is ready for any photo opportunity. If a camera needs to be steady for a fast and opportunistic photo moment, the monopod may be placed into the monopod pouch for instant stability. Hold the camera with the left hand close to the body. This will stabilize the monopod. Spread your feet for the most stable position for taking a photograph. Practice using the monopod with option 4 until you feel extremely natural and comfortable.
Practice your breathing techniques and as well as your shutter control with your monopod to produce the sharpest photographs possible.
The Multi-Purpose Tripod
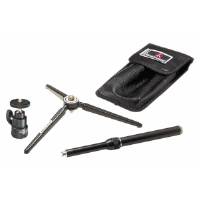 The Multi-Purpose Tripod is a very light and versatile piece of equipment. The tripod can be as low as 3 3/4" and as tall as 11". This particular tripod also has a universal ball head for maximum flexibility of horizontal as well as vertical photographs. The height of the tripod can be adjusted exactly from 3 3/4" to 11" since the center shaft can be raised or lowered to fit almost every situation. Another advantage of the Multi-Purpose Tripod is that it can be placed on the ground, on boulders, on a fence, etc. to produce a very stable tripod if a longer shutter speed is necessary or multiple panoramic landscape photographs are needed.
| 
