|
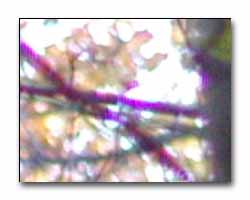 It seems that there are always a few of your photographs that manage to have some "Purple Fringing" with digital cameras. And, of course, it seems to be the ones that you favor the most. There have been
numerous technical articles written about the cause of this complaint. The bottom line is that it is an inherent problem with some digital cameras and it normally occurs when an area of a photograph is overexposed. Using software applications such as Adobe Photoshop, it is possible to decrease the visibility of the chromatic aberrations.
It seems that there are always a few of your photographs that manage to have some "Purple Fringing" with digital cameras. And, of course, it seems to be the ones that you favor the most. There have been
numerous technical articles written about the cause of this complaint. The bottom line is that it is an inherent problem with some digital cameras and it normally occurs when an area of a photograph is overexposed. Using software applications such as Adobe Photoshop, it is possible to decrease the visibility of the chromatic aberrations.
How To Repair Chromatic Aberrations With Adobe Photoshop
This technique replaces the magenta color with a lighter gray shade. It does not completely fix the problem, but it makes it less visible.
1. Open the file. Choose File --> Open --> Enter the image name to be fixed.
2. Hold the Ctrl Key down and hit the + key a few times to zoom the image to 100%.
3. Move the image on the screen so that the chromatic aberration is visible.
4. Choose Image --> Adjust --> Hue/Saturation. The screen displayed below will be displayed.
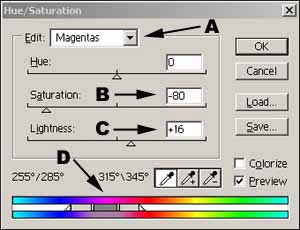
5. Click on the Edit down arrow and change the color to Magentas (see A).
6. Change the Saturation to -80 (see B) and the Lightness to +16 (see C). This is just an average approximation. You may want to change these numbers slightly depending on the image. The screen displayed below will be displayed.
7. Slowly push the color ramp (see D) either up or down the spectrum. Be careful to keep the spectrum in the Magenta level. Once you see that the chromatic aberration has been cleared, stop and click on OK.
8. Move the image around the screen to make sure all the chromatic aberration is eliminated from the whole image.
9. Save the image.
| 
