|
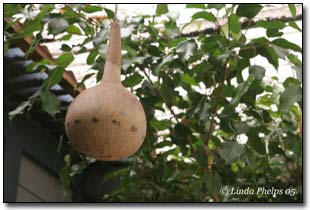
Here is the original unaltered photo of our example (Image 1). The following techniques used for this gourd photograph will give you ideas to apply to your own work flow as you edit your images in Adobe Photoshop.

Normally my work flow starts with doing a levels adjustment. For this photo the sky was altered a bit before going to the levels adjustment, under image -- adjustments, on the top tool bar. I clicked on selective color in the adjustment menu. Then selected the white color. Here I played with the color slides to tweak a little more color in to the sky. This is a nice simple way to add color to a white or almost white sky. This method also picks up all those little tiny places that are hard to deal with in other methods.
It is always better to do the levels using the slide adjustments rather than the auto levels. Normally I just click the mid tones slider and the dark one. The mid tones can be a strong green, red, brown, gold etc. I do not like to use blue, because when you go to look for the darkest point the color is yellow. The yellow can be hard to see sometimes, so I stay way from it. To find the lightest point move the far left arrow all the way to the right until you can only see a few little white places. For the darkest point slide the far right arrow as far to the left until you can only see a few darker spots. Chose the darkest one and click. If the histogram does not end in the graph, you will need to back up the arrow until you see the beginnings of another color, then click that color. If the image looks way too dark after this levels treatment. You can make the mid tone lighter by sliding the middle arrow a little to the left. Do not do too much, you can enhance this with curves later.
Next some saturation was added to the whole image. Then a little cloning was done to add a few leaves over the washed out spot at the top near the string on the gourd bird's nest. Following that I clones out the lighter gray on the lower left corner.
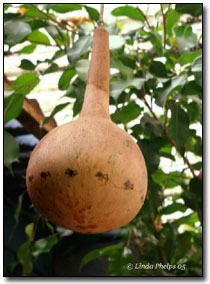
I had already decided that this photo would look much better if it were cropped to make a vertical. So here is a hint that I have learned the hard way: Do not crop until you are completely sure you are
 finished with the editing. If you should want to use the history brush, it will not work once a crop has been done. Using adjustment layers is a good idea... but I never developed that habit.
After the background was finished, I moved on to the gourd it's self. I used the magnetic lasso to select the gourd. Here I added some more saturation & contrast to the gourd to enrich the warm colors. Then the cropping was done to put all the attention of the subject matter.
The gourd alone was selected again. Then I used the unsharp mask under the filters menu, sharpen, and unsharp mask. Once I clicked for the mask I set the amount to bring out the details in the gourd. The radius was set to 1.5 to brighten the golden colors. It is a good idea to set your radius first, because the size of the radius effects the amount of sharpening you get as you slide the slider to the right. I decided not to add any sharpening to the background to keep it softer than the subject. For most projects you need to play around with the slides until you find a combination that works well for you.
These tips are my personal way of editing my images. They are not meant to be rules that must be followed religiously. The content is for suggestions only.
| 
