New From Old - A Digital Restoration TutorialPhotography and Text By Andrea Corrie © All rights reserved.
|
 
Restoring images from sources other than your digital camera is a time consuming but satisfying way to
utilize and expand your image editing skills.
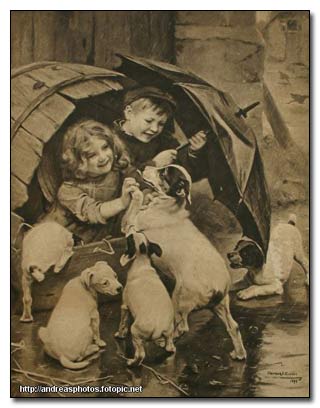
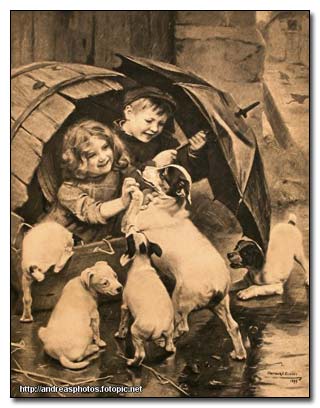
This tutorial describes the steps taken to restore a sepia reproduction print by Arthur Elsley, titled 'Full Inside'. The print dates from 1910 and it was languishing in a frame minus its glass. The damage sustained was mainly 'foxing' of the paper from damp and one rather large scuff mark, so it was not too daunting a project.
I removed the print from the frame and photographed it flat on a table in front of a window in natural daylight, using my Canon 300D set at AV 5.6, and opened, rotated and cropped the start image in Photoshop.
Before I outline the procedure for this restoration, I think it is worthwhile elaborating on the Photoshop tools that were used.
My chosen repair tool was the clone stamp, which I use in preference to the healing brush - pure laziness on my part, I must confess, as I have not spent time getting to know the healing brush. This may well be a better repair method but it is as yet an unknown factor to me.
I have learned, when using the clone stamp, optimum results are obtained by:
Using a small,soft edged brush and varying the size via use of the square brackets where necessary.
Frequently zooming in and out of the image to ensure the repairs look natural.
Dropping the opacity to around 72% to avoid hard edges.
Selecting random areas to avoid repeating patterns.
I recently discovered the value of adjustment layers and they feature heavily in this tutorial. The 'create adjustment layer' icon rests at the bottom of the layers palette and is represented by a half shaded circle.
Adjustment layers are used in this tutorial to alter:
Levels
Curves
Channel Mixer.
The beauty of an adjustment layer is that you can visualize it as a transparent pane placed over your image. You know that you are working on this pane, and it will not weld itself to your image until right at the end when you flatten the image. Hence if you make a ghastly error, it is a simple matter to send the layer to the trash can without affecting your working image. (Note also that this wondrous tool may be applied with equally good effect to any of your digital images) Sadly, I cannot claim credit for this discovery; I found it in Katrin Eismann's 'Photoshop Restoration and Retouching' book which is a superb reference source for any restoration work , and from which a great deal is to be learned about imaging editing in general.
The final point to note before embarking on this tutorial is that I have omitted two elements that initially appear tempting to alter; brightness/contrast settings and the sharpen/unsharp mask filter. The use of the 'levels' and 'curves' adjustment layers offers sufficient and subtle changes in brightness and contrast. Sharpening of this image would impart it with a 'modern' look that does not fit with the period. For subtle tonal adjustments I would unhesitatingly recommend the avoidance of 'blanket' brightness and contrast alteration.
TUTORIAL:
1. Open the original image and immediately create a new layer, which will be your working layer. (This is the golden rule for editing any image - never work on an original.)
2. Zoom in (2 -3 clicks) and observe the damage to be repaired; think about how you will tackle the different obstacles within the image.
3. Begin work with the clone stamp. Work in an orderly fashion from top to bottom, left to right; zoom in and out frequently to keep a watch on the effects. Think 'subtlety and naturalness' and don't rush the process - as a guide, I spent 25 minutes on repairs to this image.
4. When you are happy with the damage correction, select the adjustment layer icon (the half-shaded circle at the bottom of the layers palette) and choose 'levels ' from the drop down menu. Bring the left slider in first to the point where the histogram begins to rise, and then bring in the right slider towards the rising point on the right. Move the sliders gradually and slowly until the dark and light areas look the way you want them to.
5. Select the adjustment layer icon again and choose 'curves'. Experiment by clicking various points on the line and moving very carefully up or down until desired effect is reached.
6. The final adjustment layer - channel mixer - is intended to balance your favored sepia tone. Increase or decrease all three channels - red, blue, green - until you like the effect.
7. Now go to layer - flatten image (at the top of your screen). Immediately create a duplicate layer.
8. Look at your finished image. Does it need more depth? If so, create a duplicate layer. Switch the mode to multiply which will turn it very dark. Gradually reduce the opacity until you feel the effect is right.
9. Finally, flatten the image again and set the size appropriately if you are going to print the picture.
10. This particular image would lend itself well to a greetings card and if I were going to do this I would follow these steps:
Open a new image and set the size at 7 x 5. Go to edit - fill - white 100%.
Immediately duplicate layer as it will be used for a 'stroke' line later.
Open the final image picture and either copy and paste or drag and drop it into the new file.
Use edit - transform - scale to resize appropriately leaving space at the top or bottom for text and sufficient room to insert a stroke border.
Select the rectangular marquee and draw a line approximately half an inch from the edge of the card on all sides.
Go to edit - stroke - 3 pixels - black and click OK.
Using the text tool, add appropriate text. In this instance I might simply insert the picture's title, which is 'Full Inside' in an 'Old English' script font.
Flatten the image and save it. When printing, remember to rotate the image 90 degrees clockwise first.
I hope you find this tutorial useful.
|
|

