|
Kayak photography is an ongoing challenge since there is constant motion from either side to side or up and down. Water conditions can change in a moment with your life saving paddle not in your hands. And, at the same time, you have an expensive camera in your hand that can not take a dunking in the water.  The lighting conditions are also a challenge as well as height of the camera, which remains the same as your sitting position within the kayak. You don't easily have the ability to change the height of the camera, even though some of us have been taught to stand up on the seat of our kayak while the kayak is in water (I don't recommend trying this). So, as we all can see, kayak photography can be frustrating, dangerous as well as rewarding. Most On-The-Go Kayak Photographers will not spend the necessary time needed to photograph, since holding a camera puts the photographer in a very unstable situation. The following hints and tips are for the OTG Kayak Photographer. There is a fine balance between being in-the-moment, enjoying the paddle, and kayak photography. These tips and hints are for the person who is not quite happy with their results, but wants to gain a little more insight on how to become a better kayak photographer. There is additional information in the kayaking photography techniques section.
1. Read the "How To Protect Your Camera" section:
Protecting the safety of your camera is a balance between which Camera Protection System (CPS) you want to use and what is the most practical method you want to use. The protection of your camera will ultimately be based on your kayaking skills and what type of paddling you will do. Practice the exercises described in the section before attempting kayak photography.
Learn how to protect your camera.
2. Never Hang The Camera:
NEVER hang the camera with a strap around your neck. It is extremely dangerous. There is a tremendous temptation to say, "Well, it is only a short paddle to where I would like to photograph." The problem is that a tough paddling situation might occur. If you happen to flip your kayak over with a strap around your neck, there is a distinct possibility that the camera strap will wrap around your neck.
3. Always Use A Strap:
When your camera is in your hand(s), make sure a short camera strap is wrapped around your wrist. If you drop your camera, at least the camera would have some protection by being held by your wrist. My camera strap fits securely around my wrist with about an inch of additional strap. If the camera slips out of my hands at least it is held by my wrist and it will not drop in the water or drop on to the kayak deck.
4. Always Use A Paddle Leash:
When you hold your camera and your paddle is placed across the cockpit, there is always a chance that your paddle could drop in the water. Within seconds, it could be out of reach and you will be in a dangerous situation. Use a paddle leash to attach your paddle to your wrist, to the deck or to the side deck line. Another option would be to bring your left elbow down to the cockpit to hold the paddle between your PFD and your left elbow. That would keep the paddle from dropping in the water. Learn about paddle leash options.
5. Carry An Extra Paddle:
You should always kayak with an extra paddle, whether or not you are going to do kayak photography. It is a definite safety precaution in case your paddle breaks or floats away.
6. Always Paddle With A Partner:
You should always paddle with someone, especially if you are going to do kayak photography. Any time you are constantly letting go of the paddle, possible dangerous situations can occur. Your kayaking partner can always retrieve your dropped paddle.
7. Raft Up:
It is more stable and safer if you raft up with your partner's boat. Your partner will stabilize your kayak and, at the same time, will be holding the blade of your paddle.
8. Keeping Your Camera Warm:
In cold weather, don't try to keep your camera warm as it is a losing battle.
9. Get Ready:
Always be ready for action. Consider setting the camera for auto-focus.
10. Carry A Disposable Waterproof Camera:
 You should always carry a disposable waterproof camera for those close encounters that have a little dangerous situation. The camera strap can be attached to your wrist while you paddle through turbulent water. When the moment arrives, a fast photograph can be taken while you are still holding on to your paddle with your left hand.
11. Watch Out For Water Drops:
Always make sure there aren't any water drops on the lens as it will ruin most photographs. If you are paddling in salt water, the salt in the water will cause damage if you try to clean the lens without fresh water. A few drops on the lens from your water bottle will help clean the lens from salt water.
12. Think Close:
Many views that you see are quite far away and when you get your photographs back, the main subject is too small. Try to get as close as possible to the subject and you will be happier with your photographs.
13. Watch Out For The Sun:
Always realize which direction the sunlight is coming from and how it will affect the photograph. It seems that the sun is usually in the wrong direction or casts a glare on the water during kayak photography opportunities.
14. Be Aware Of The Brim:
Almost everyone wears a brimmed hat while paddling or on the beach. Always be aware of the shadow on a person's face when taking a photograph of a person wearing a brimmed hat. If the brim is raised a bit from the forehead, there might be a little more light on the person's face. Otherwise, you will always have a very dark, shadowed face in your photograph. Usually, the person's hat can't be removed due to "Hat Head!"
15. Study Photographs:
Study kayak photography that you admire and notice what the photographer did to make the photographs appealing to you. You might want to send an email with specific questions to the photographer and you might receive a response back.
16. It Is Dangerous:
Kayak photography is dangerous because you have to set your paddle down, grab the Camera Protection System (CPS), remove your camera from the CPS, hold your camera for the photograph, place your camera back into the CPS, put the CPS away and grab your paddle. All this might have to be done in a very short period of time. If you have a sprayskirt, it also might mean that you are opening and closing your sprayskirt, too. When you don't have a paddle in both hands, you lose stabilization that the paddle offers. Don't try to photograph over your limits as a paddler. Your camera can always be replaced, but you can't.
17. Anticipate:
Always be aware of all the elements around you when you decide to photograph. Be aware of hidden rocks, waves, etc. You don't have use of your paddle while photographing. You might be drifting. Make sure that you don't enter a situation that might create problems since you may be concentrating on the photography instead of paddling.
18. Be On The Water Early:
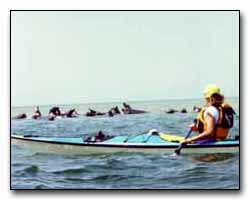
Many times the water is, as the saying goes, like glass. The morning sun has great lighting and many kayak photographs have been taken in the early morning. When Blue Fish jump out of calm water in unison, it is a beautiful sight to behold and photograph. Take advantage of an early morning paddle.
19. Use The Bow:
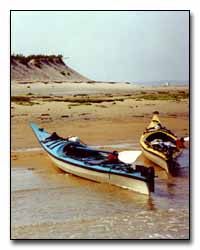
 Sometimes, adding the bow of your boat increases the excitement to your photograph by saying "I was the one on the water taking the photograph and this is exactly what I saw." By having the bow in the photograph, it documents the fact that "I was there."
20. Use The Longest Lens Available:
Bring your longest lens available. It doesn't have to be the lens that you are going to use during kayak photography. It might be a lens that you will use when you land on the beach, etc. There are many times you will see shore birds at a distance, seals, turtles, etc. and a shorter lens might not fit the situation.
21. Decide On Editing:
Digital editing is a controversial topic. You must decide whether or not you are going to indicate if your photograph has been changed with digital editing software (not cropping). Digital editing is changing the photograph by eliminating sections of the photograph that you do not like, changing colors, highlighting areas, adding a touch of sand over the seaweed, etc. The decision is totally up to you whether or not you indicate whether your photograph was digitally enhanced.
22. The Use Of Your Kayak:
Use your kayak in as many photographs as possible. Just remember to close the hatches, remove dirty seaweed from the bow, etc. Sometimes, when the photographs are viewed later, there is always something on or in the kayak that we didn't realize was there.
23. Tuck Your Camera:
When I finish photographing in a certain area and I have a short paddle to another location, I will place my camera under the top of my PFD near my neck. This allows me to quickly take out my camera and capture another moment while I am paddling. Obviously, there is a possibility of getting the camera wet by a wave or a dunking. That is why you should always practice your bracing skills.
24. Use The Current:
Sometimes the current can be a valuable asset when photographing birds or other wildlife. Place your paddle down over your cockpit and allow the current to slowly move you closer to the subject. You will be able to get extremely close to birds using this method.
25. Use The Internet:
Use the Rare Bird Alert Network on the Internet and other resources to notify you of possible rare birds in your area. Also search the Internet for postings on bird sightings from your favorite places that you kayak. This will help you in advance to identify what birds are available to photograph.
26. Use Your Imagination:
Don't rely on just seeing situations to photograph. Land on the beach first and photograph your partner landing on the beach through the surf. Adding different perspectives will improve your kayak photography.
27. Don't Leave Your Camera On The Deck:
The deck of a kayak gets very warm and it will eventually heat your camera and possibly cause camera damage. Don't ever leave your camera under the deck bungee for any extended period of time. I never leave my camera on my deck at all.
28. Carry A Gallon Zip Lock Bag:
The gallon zip lock bag is great for emergency situations and should be carried in your PFD pocket. If a situation occurs that you must put your camera down and paddle, you can quickly put your camera in a waterproof zip lock bag and not have to worry about your camera getting wet. In some PFD's, the zip lock bag with the camera inside can be placed into one of the PFD's pockets.
|

