|
Photographs taken with a single on-camera flash look dull, boring, and flat. Ever wondered why this is? Our eyes are designed for 3D viewing and to see any depth in a 2D photo we must use other means to impart depth and dimension. We use shadow to create an illusion of depth. With a lack of shadow and contrasts a photo has a lack of any illusion.
How can we create this illusion? By adding a second off camera flash and varying the light ratios. The off-camera light becomes the key or main and the on-camera becomes the fill. By varying the power ratios we can create shadows and an appearance of depth.
 In a dual flash scenario the key produces the shadows and the fill controls how dark or light they are. Both are equally important. It is the contrast between light and dark that will catch our eye.
Most new photographers start with a built-in flash or an external flash mounted in the above the viewfinder in what is called the "hot shoe". Neither one will produce an acceptable shot, so let me start by describing how to improve the quality of single flash lighting because it is a prerequisite for dual lighting.
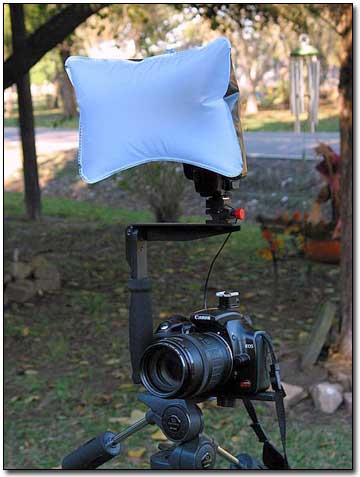
The one thing that can be done to improve the quality of single flash photographs is to raise the flash head above the lens even if the camera is rotated to the portrait mode. There are many different brackets on the market. Some flip the flash, others flip the camera. The one I use, a Stroboframe flip bracket, made by the Saunders Group is shown below.
Raising the flash head above the lens accomplishes three things. First it eliminates the chance of producing the dreaded red eye. Secondly, the downward angle of the light puts the shadow directly behind a subject that is in front of the camera. Finally, the downward shadows under the cheeks define their shape in a flattering way and the nose shadow falls under the nose where it is not a distraction. Note: if you
 see nostrils in a photo your camera try a higher camera angle; the top of the nose is much more flattering.
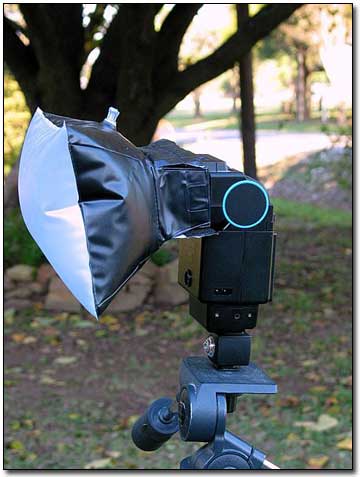
And the key light setup with the optical slave.
You will notice the flash has a mini soft box. This is a cheap $10 one off of Ebay. It is inflatable, allowing it to be deflated and easily stored in a camera bag. The best diffuser is the one on hand when needed. I have tried many different bounce and Tupperware looking ones and have found that they are great when you have nice all white, low ceilings but for most situations one that directs the entire flash forward will suffice. Unlike the bounce diffusers a mini soft box gives the same consistency outdoors and consistency is the name of the game with lighting.
When it comes to equipment I can not see spending money needlessly. I will buy equipment when necessary. For that reason I do use the sophisticated Canon 430 EX for my two digitals and the 430 EZ for the A2 or the EOS1, when using one flash as in wedding work. But when working manual some good cheap flashes such as the excellent Vivitar 285's will suffice. No need to spend several hundred dollars when less will suffice.
Setting Ratios with Manual Flashes
Lighting ratios are based upon the intensity of light reflecting from the highlights of the object illuminated vs the light reflecting from the shadows. The fill light on the flash illuminates everything the camera sees. The light from the off camera key light overlaps the fill. When two flashes of equal intensity are used at the same distance the overlap produces highlights which reflect twice as much light as the shadows. This is denoted as a 2:1 highlight-to-shadow or reflected ratio. The overlap of key over fill that puts two units of light in the highlights for every one in the shadows. A 2x difference is equal to one f/stop.
Having both lights identical allows the lighting ratio to be controlled by the relative distance of each light to the subject. It is the only remaining variable.
Equal distances will produce a 2:1 H:S ratio. This ratio has light open shadows with considerable detail. Is well suited to portraits of women, children and animals where shadow detail is desired.
Moving the key light closer than the fill will produce darker shadows. These easy to remember distances combinations will produce a 3:1 lighting ratio, with exactly one-f/spot difference in exposure between them:
Camera fill / key light on stand: 16ft/11ft, 11ft/8ft, 8ft/5.6ft, 5.6ft/4ft, 4ft/2.8ft
You'll note how the distances are similar to f/stop numbers. The "key" light is always the distance equivalent of one "f/stop" closer than the on-camera fill, resulting in 2 units of key + 1 unit of fill in the highlights for every 1 unit of fill in the shadows; 3:1 reflected ratio. One last note about an easy setup.With the fill flash, on the camera the key flash is always placed 45 degrees from the NOSE of the subject, not from the camera.
| 
