|
It's exciting to explore a new area that you've read about. But don't get so excited that you can't find your way back to where you started from. Sometimes, during the moment of OTG
 Photography, we sometimes forget that if proceed into uncharted waters, we might not be able to find the
way back. That is when some navigation knowledge in the woods proves worthwhile and absolutely necessary. How many times have you seen some wildlife in the distance and without even thinking, you're off in their
direction? You cut through this opening and that opening. At the same time you're saying to yourself, "I'll find my way by backtracking." Maybe you don't even think that you're going that far off the beaten path. But, low and behold, you're somewhat lost. Maybe you've been somewhat disoriented numerous times and you've always been fortunate to find your way back so you haven't been too concerned about being lost. Anytime you enter the woods, there is a very good chance that you may get disoriented and possibly become lost. You can always trust the information in your head versus the equipment that you take with you as equipment is sometimes either damaged or lost.
A Simple Exercise:
Visit an area that you are familiar with that has thick woods. The most beneficial area would have also have four boundaries surrounding the woods such as a road, trails, fences, etc. If you can't find a place with four boundaries, at least have your starting point a road or a trail that runs perpendicular to the path that you are going to take into the woods. Start from your car and walk straight into the woods for at least 350 to 500 yards. Make sure you can't see your car or any signs of where you started from. Turn around 180 degrees and walk directly back to where you started from. Most people will not come close to their starting point because what we think is straight is really either to the right or left five to ten degrees. The farther you go into the woods and then turn around and head back, the further right or left from your starting point you end up with.
The six forms of aidless navigation have both pros and cons. You should be aware of all these techniques and use one each time you enter the woods without a trail or path to help you return safely.
1. Three Object Sighting:
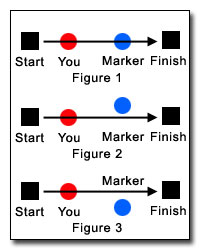
 This technique is used successfully on both land and water. This technique can only be used when you have a clear view from the original sighting in back of you and in front of you. The three object sighting helps you to travel in a straight line toward your destination and back to your starting point. The three objects use an object in back of you, an object in front of you and your final destination (figure 1). When all three objects plus yourself line in a straight line, you are traveling straight towards your destination. When the object in front of you appears to the left of your final destination, you are traveling off course to the right of your final destination (figure 2). When the object in front of you appears to the right of your final destination, your are traveling off course to the left of your final destination (figure 3). This technique is extremely accurate and very easy to use.
2. Back Track:
This technique is used to follow your tracks back from where you started from. This technique works well when it is raining, snowing or you're traveling on sand, mud or any land that registers your footprints. The disadvantage of this technique is a heavy snowfall (your tracks are covered or white out), darkness, heavy rain (your tracks are washed away), etc. Don't rely on this technique to help you find your way back to your starting point as other elements to hide your tracks may occur. Use this technique as well as other techniques to help you back.
3. Blazing:
This technique uses markers that are created along your route. Markers can either be the breaking of small branches, making a little pile of rocks, placing a branch on the ground, tying a little string to a branch, marking the branch or any little marking method that you can created that indicates that this is the way back to the beginning. Be careful to always point the marker that you created towards the direction that you should return. Be careful of the small branches that you are breaking so as not to endanger the plant or tree.
4. Birds Eye View:
This is a more involved technique as it takes preparation in advance. Study the map of the area in advance and try to picture, based on the topography, what you expect to see and from what direction. When you understand the map and the topography, you will be able to realize where you are and which direction you need to go to return to your starting point.
5. Notice Distance Objects:
Depending on the time of day or night, notice the sun, moon, stars, planets, North Star, etc. Which direction is the sun? The sun is in the South at the highest point of the day, the east in the morning and the west in the afternoon. If your shadow is on your left when you walk into the woods, your shadow will be on your right when you are returning. Based on the direction of the distance objects, you will have an idea of which direction to proceed to return.
6. Tell A Story:
As you progress through the woods, created a story for each prominent object or location that you pass. If you pass a stream, a huge rock and a broken tree, your story might consist of: "I used to be young and swim in a stream and climbs rocks. When I was in junior high school, my father had to take down a tree in our front yard due to a violent storm. The story would continue until you reached your final destination. Take the story and recite it backward and follow the path back with the clues from the story. You might want to also combine the story with blazing techniques.
Whatever technique you decide works best for you is the right technique. The more experienced you are with any of the techniques, the safer you will be.
| 
