|
In my quest to play with filters, I figured my next step was to get an infrared filter. I read a bit about them, and saw many statements of "They won't work on the G3 or most digital cameras." Ok, this is mostly correct. No, the G3 was not designed for IR photography, nor are most digital cameras. They have a filter at the CCD chip that filters out IR light to reduce the noise level. There are varying degrees of this technology. Some say the Minolta Dimage is a great IR camera as well as the Canon G1 and G2. I figured, if I could get the filter cheap enough, it did not hurt to try. I finally found the Hoya Infrared R72 filter on eBay for $30. Too good to pass up. My journey into the infrared world was about to begin.
The first thing I learned was the filter takes a very red image. Really, a dark pink image. Well, it makes sense, considering it is a very dark red filter. This is fixed by changing the white balance on the camera. I won't go into detail yet, as I will do a step-by-step work flow in a few minutes. Needless to say, my very first tries were woefully disappointing. A lot of trial and error was needed to figure out how to take these pictures. Focusing was a problem because the filter is so dark, the camera cannot "see" anything to focus on. The shutter speed is very slow, again due to the darkness of the filter. This was going to take some work before I got good results. However, I have finally started getting quite good results.
Below are the steps to take in the field in order to get good photos using the R72 filter.
Make sure there is a lot of light. Most people will say not to shoot in the midday sun, but with the longer shutter speeds required with IR, this is a perfect time to shoot.
With the filter on the camera, get a Custom White Balance using as white a piece of paper as possible.
Make sure the camera is in the Manual Mode or Shutter Priority Mode. I prefer the Manual Mode because I like shooting the aperture at f/5.6 but need to vary the shutter speed.
At this point, before adjusting the Shutter and/or Aperture, take the filter off.
Compose the shot in the viewfinder or LCD screen.
On the G3, I hit the M button to lock the focus in place. If you have an SLR, manually focus the shot.
Put the filter back on and adjust the shutter and aperture until you get an exposure compensation amount of -1/3 or -2/3.
Take the shot.
To take another shot, return to step 4. You should not have to readjust the White Balance unless there is a significant change in light, as in clouds moving in.
The following images show a before and after picture taken within seconds of each other.
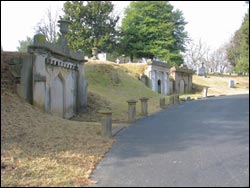
This photo was taken with a Canon PowerShot G3 with a Hoya Circular Polarizer filter. Also used was a Manfrotto 3021PRO tripod and the Manfrotto 3047 head.
The camera settings are as follows:
Aperture-f/4.0
Shutter-1/50 second.
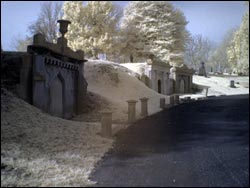
This is the infrared shot. Again, taken with the Canon PowerShot G3 with the Hoya Infrared R72 filter. Also used was a Manfrotto 3021PRO tripod and the Manfrotto 3047 head.
The camera settings are as follows:
Aperture-f/3.2
Shutter-.8 second.
The post processing of the infrared photos require some interesting changes to the photograph. It requires channel swapping, level and curve adjustment and some color balancing.
Below are the steps I generally take when processing the infrared photographs.
Open the image in Photoshop 7 (or CS or 6, I believe.) I have 7, so that is what I will use in this example.
Go to menu item Image->Adjustments->Channel Mixer. This opens the Channel Mixer dialog box.
With the Output Channel set to Red change the Red source channel to 0% and the Blue source channel to 100%
Change the Output Channel to Blue and change the Red source channel to 100% and the Blue source channel to 0%
Click OK to close the channel mixer, applying the changes.
The image should have very muted colors, almost foggy-looking.
Go to menu item Image->Adjustments and click on "Auto Levels." I realize this goes against everything you have been told. Try it and see if it works on the image. If not, go back a step in the History and adjust the levels on your own. I have found the results using Auto Levels to be satisfactory in most cases.
Go to menu item Image->Adjustments and click on "Auto Color." Again, this is just to see what happens. Sometimes it works, sometimes not. Make sure, if of you change the colors, do not overdo the green channel. Over saturating the red and blue give interesting results, however.
Go to menu item Image->Adjustments and click on "Auto Contrast." Just give it a shot. Sometimes it works, sometimes not..
The last step is to adjust the curves. Go to Image->Adjustments->Curves and adjust until you are happy with the results.
The following shows the before processing in Photoshop 7 and after processing.
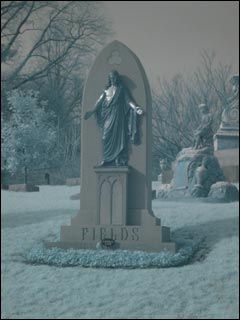
This is the raw image straight from the camera. I did resize it so it would load quicker. As you can see, the colors are very muted and the tone dark. To be completely honest, it looks bad.
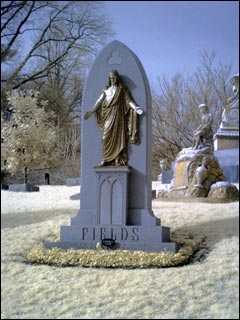
This processed image is much better. After fixing the colors and adjusting the levels, the image is very appeasing. It offers a very distinct look and feel. There is no snow on the ground.
|

